Create and manage an affiliate program for products you sell through E-junkie purchase buttons
- An affiliate program allows you to recruit affiliates as "online sales reps" who advertise/market your products/services for you, referring buyers to your sales page in exchange for earning a commission on each sale resulting from their referrals;
- You can pre-screen affiliates before allowing them to join, or just offer your affiliate program publicly on your site or in our online Marketplace for anyone to join;
- Affiliates receive their own free E-junkie accounts that will provide them with their affiliate links and information about their successful referrals and earnings;
- All you need to do is set your landing page(s) and the commission percentage we award to your affiliates;
- Affiliate tracking is only available for purchases processed through E-junkie purchase buttons. We cannot track third party sales.
If you are an affiliate and want to promote products for an E-junkie merchant, please see this help page for affiliates.
How Our Affiliate System Works
When a buyer clicks an affiliate’s link we place a tracking cookie in their browser and they will be redirected to a page of your choice.
If that buyer makes a purchase from your E-junkie account within six months of clicking that link we will credit the referring affiliate.
This means that the sales doesn’t have to happen on your first landing page, and that tracking will still work even if the buyer leaves your site and returns later! No matter which link the affiliate uses, whether it is your Common link or a Product link, our tracking will work for any item in your account so you do not need to worry about referrals being missed if a buyer decides to purchase a different item at a later time. The affiliate who introduced them to you still gets credit!
IMPORTANT NOTICE: E-junkie's affiliate system is free for affiliates to use at no charge. You may not require payment of any kind of fee for anyone to join or participate in your E-junkie affiliate programs, and we will suspend any merchant accounts in our system who are discovered to be conducting such schemes.
Obtain Your Affiliate Sign-Up Link Code
You can get started via the Affiliate Program Settings link, which is available in the Manage Affiliate Program section of your account menu, on the left hand side of your screen.
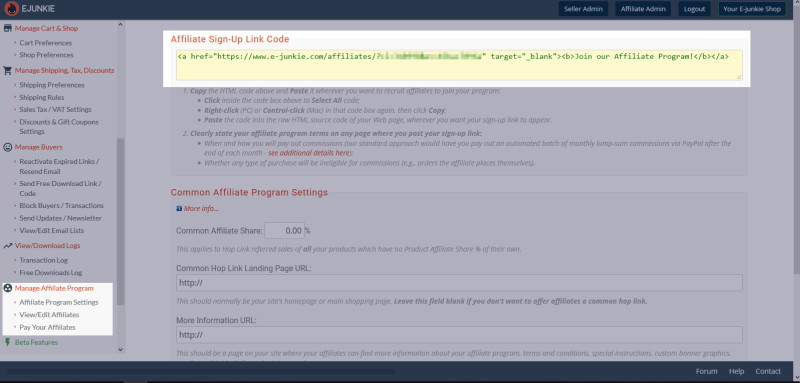
The first thing you will see at the top of this page is your Sign-Up Link. This link is provided with some basic HTML that turns it into clickable text, and it is how you will be able to recruit new affiliates into your program. We recommend displaying this on a special page with all of the details about your affiliate program to let potential recruits know what to expect when working with you.
This link leads to our sign-in/registration page, where affiliates will be signing up for their own free E-junkie accounts. After an affiliate registers or logs into an existing E-junkie account they will be added to your program. You may also join your own program for testing purposes or to familiarize yourself with the system.
If you ever hear from an affiliate that hasn’t been connected to your program after registering with us, have them try clicking your Sign-Up Link a second time just to be safe! Sometimes certain browser settings interfere with the registration process.
You don’t need to display your Sign-Up Link publicly if you would prefer to screen your affiliates or keep the program private. You also don’t need the full HTML we provide if you aren’t displaying the link on a website. You can simply use the address in the first set of quotation marks after <a href=
If you have created a page with information and resources for your affiliates you can enter its address in the More Information field at the bottom of this screen. We’ll provide your affiliates with a quick link back to this information from within their accounts.
Affiliates will be registered to fully access all of the settings of your affiliate program. No one will be restricted to working with a particular item or set of items.
How to enter Common Affiliate settings:
To create a basic affiliate program you just need to set the percentage of each sale that you wish to reward for referrals, and a page where your affiliates will send potential buyers.

-
Common Affiliate Share:
- The percentage you will pay out of each sale.
- Common Hop Link Landing Page URL:
- The webpage you want buyers to see after clicking an affiliate link. This is usually your main website/sales page but it can be any address you like.
- More Information URL:
- An optional location for a special instructions page for your affiliates. You have full control over your program so you can set all of the rules!
- List affiliate program details in E-junkie Marketplace and your E-junkie Shop:
- This optional setting will display your Sign-Up Link in your Shop pages.
How to enter Product Affiliate settings (Optional)
If you would like to provide different landing pages for a specific product in your account and/or wish to set different payment rates for a product then select that item in the menu at the bottom of the screen. This will open up some new fields:
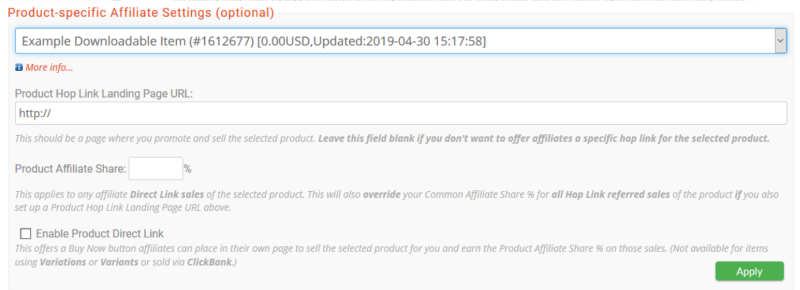
- Product Hop Link Landing Page URL:
- This can be any address, just like your Common version. It can even be the same address again, or perhaps the address for a webinar with a special offer at the end.
- Product Affiliate Share:
- This rate is always used if it is set, overriding any Common Share that you may have. However, in order to take effect the product must also have the Product Hop Link Landing Page URL above set as well.
- Enable Product Direct Link:
- This checkbox is a special option which will provide affiliates with the basic HTML code for one of your account’s Add to Cart buttons, so that they can sell directly from their own websites. These orders go straight to your account and you will still be collecting the money as normal, but the sale will be credited as a referral for the related affiliate. Due to technical limitations, this option is not available for products with options (Variants or Variations).
Exempting Items from Affiliate Rewards:
The easiest way to do this is to not use the Common account-wide settings. Leave your Common Affiliate Share set to zero and only use the Product settings to set shares for the items you’ll pay on for referrals.
If you do use the Common settings you can still exempt an item by setting its Product Affiliate Share to 0% and giving it a Product Hop Link Landing Page URL. That 0% will override your Common Affiliate Share.
We recommend at least paying a nominal share on all items, even if it is just a small amount. After all, if a buyer purchases an excluded item after a referral there’s an affiliate responsible for introducing them to your business.
Paying Affiliates
Because E-junkie does not handle any of the money from your sales it is necessary to manually pay your affiliates. Our system was designed to handle this on a monthly basis via PayPal but you are free to choose your own schedule and means of payment -- just be sure to communicate that clearly to your affiliates!
The Pay Your Affiliates link available in your account menu will generate a masspay.txt file that lists each affiliate’s earnings for the previous calendar month based on your transaction logs at the time of the report. Any refunds processed by PayPal will be removed from affiliate earnings, but other systems do not report refunds to us. We recommend running the report in the middle of the following month so that you can be sure that no last minute refunds change the earnings report.
The masspay.txt file is intended for use with PayPal’s Mass Payment feature, which has certain restrictions. Please contact PayPal to see if this service is available for your account; otherwise, it is still possible to use the information in the masspay.txt file to manually pay each affiliate individually. You can also modify the file to upload with PayPal's new Payouts Web method.
You can also run manual reports on affiliate earnings in your Transaction Log screen. You can select an individual affiliate and select any time frame you like to run a report of their earnings. Affiliates will also have access to sales records for orders they have referred to you.
Editing Affiliates
You can view all of your current affiliates via the View/Edit Affiliates link in your account menu. On this screen you have the option of assigning an extra percentage to individual affiliates if you wish to reward them for high performance or for any other reason.
You also have the ability to delete and ban any affiliate from your program if you feel it is necessary. Deleting an affiliate will prevent them from reconnecting with your program and shut down any links they have. They will also receive an email letting them know that they have been removed from your program.
We only recommend using this option to sever ties with affiliates who are acting in bad faith. This decision can be reversed by entering an affiliate’s account ID number into the Undelete Affiliate field if necessary. This ID is available on the affiliate’s main admin screen within their account.
Customize Thank-you Pages Selling Ebooks and PDF Stamping Sending Updates and Newsletters Customize Thank-you Email Discounts and Sales Sales Tracking with Google Analytics, AdWords, Facebook Pixel, etc. Charging Sales Tax and VAT Integration with custom scripts and third-party services Transaction Log Block Buyers/Transactions Shipping and Packaging calculator Inventory Management Webhook integration with custom scripts and third-party services